 ApostropheCMS
Hosting an Apostrophe project with Docker
Docker is a containerization platform that lets developers build an image for their projects and then run it anywhere. This guide is for production, not development. If you want to use Docker as a development environment, you can explore using a persistent Docker volume for your project, but bear in mind that commands like npm install can be very slow in such a configuration.
The initial steps of this guide will assume that you will be hosting your database, project, and uploaded assets on the same server. The second part will outline steps for configuring to use the AWS S3 service for hosting assets. Finally, the third portion will provide guidance for using the MongoDB Atlas multi-cloud database.
Creating the image
Install Docker
Docker can be installed on Mac, Windows, and Linux machines with either a CLI interface or using the Docker Desktop application, which acts as a graphical interface to the Docker engine. For this tutorial, we will use the CLI version. You can read more about Docker and install it on your machine by following the instructions in the Docker docs. Feel free to walk through the tutorials that you find there, but it isn't necessary before following this tutorial. We will cover any necessary terminology as we walk step-by-step through getting Apostrophe running. However, please verify that your Docker install works before continuing.
Apostrophe project setup
For this tutorial, we will be using the a3-demo template. However, you can also use an existing project or create a new one by following our getting started tutorial. If using the a3-demo, follow the link and click on the "Use this template" button to fork the template into your own repo. Next, clone the repo to your local machine and open it in your favorite code editor.
Creating the dockerfile
The Dockerfile passes a series of command line instructions to build an image. Below is an example of a file to build a container for a basic Apostrophe project:
FROM node:lts-alpine3.15

WORKDIR /srv/www/apostrophe

RUN chown -R node: /srv/www/apostrophe
USER node

COPY --chown=node package*.json /srv/www/apostrophe/

ENV NODE_ENV=production
RUN npm ci

COPY --chown=node . /srv/www/apostrophe/

RUN ./scripts/build-assets.sh

CMD ["node", "app.js"]
Let's walk briefly through each of the lines. The first line specifies that this image will extend an existing image with the long-term support version of node.js running on an alpine linux v3.15 operating system. If you need another version of node, another version of Alpine Linux, or prefer not to use Alpine Linux as your container OS, you should alter this line to build from an official node.js image or a 3rd party image.
The WORKDIR command is used to define the working directory of the Docker container where all of the subsequent commands will be run. It implicitly runs both mkdir and cd commands.
By default, when we issue commands within the Dockerfile they are run within the container as a root user. Although Docker should ensure that the 'root' user inside the container can't see or interact with anything outside the container, it never hurts to use a non-root user inside the container too, just in case a flaw in the container system is found. Now that we have a directory, we reassign it to a low-level user node using the Docker RUN command and the linux chown command. Everything following RUN will be passed to the command line inside the container. Next, we switch to the new user using the USER command.
We are now going to install all of our dependencies inside of the working directory. First, we copy the package.json and package-lock.json into our project. Next, we pass our NODE_ENV=production environment variable into the build and then add those dependencies using RUN npm ci.
INFO
This means that you must commit the project package-lock.json and you must not list anything required to build the project assets as a "dev" dependency. Your project doesn't need any of those in production, right?
Following the dependency install, all of the necessary project files are copied into the container. Note that we will also create a .dockerignore file to exclude some files and folders from being copied.
Next, we run a script to trigger the apostrophe asset build (we will cover this script next). To set a unique APOS_RELEASE_ID environment variable each time we change files and redeploy, we are using the script to create a release-id file with a unique string. Otherwise, we would have to change this string each time manually.
Everything until this point helped build the container image. Those commands only run once when the container image is built or rebuilt. The final CMD line is what runs every time the container is started.
Creating the install script
The alpine linux distribution is slim and doesn't include bash, but we can access the "busybox" shell, which is compatible with the basics, at /bin/sh. Into the scripts folder at the root of your project create the following file:
#!/bin/sh

export APOS_RELEASE_ID=`cat /dev/urandom |env LC_CTYPE=C tr -dc 'a-zA-Z0-9' | fold -w 32 | head -n 1`

echo $APOS_RELEASE_ID > ./release-id

node app @apostrophecms/asset:build
We won't go through this file in detail. As covered in the previous section, it creates a random unique string and copies it out to the release-id file at the root of the project. It then triggers the @apostrophecms/asset module to build the assets. That module will read the release-id file and use the string in the build.
Building the assets inside this script, which is part of a build step in the Dockerfile, ensures the assets become part of the image, so they don't have to be re-generated every time the image is used. The same is true for the release-id file, which Apostrophe uses to identify the asset bundle it should be using. It'll be the same bundle at build time and at run time. If the image is rebuilt, we'll get a new image, new CSS URLs, and no stale stylesheets.
Creating a .dockerignore file
The .dockerignore file prevents specific files from being copied into your final image. This is important to block sensitive or unnecessary files from being incorporated into your image. Simply go through your directory and copy any file or folder name not needed to build your project into your .dockerignore file. Note that folder names are followed by a /. I'm using Visual Studio Code in this tutorial, so the topmost folder listed won't be in your project if you use a different editor.
.vscode/
apos-build/
badges/
data/
node-modules/
public/uploads/
.dockerignore
.env
.eslintignore
.gitignore
deploy-test-count
docker-compose.yaml
dockerfile
force-deploy
local.example.js
Creating a docker-compose.yaml file
In this guide, we are starting by creating multiple containers and a persistent volume. This is so that we can provide both a MongoDB instance and a place to store uploaded assets. We are going to do this using Docker Compose and a docker-compose.yml file. In the following sections of the tutorial, we will look at removing the extra container and volume by taking advantage of cloud storage and database services. Create this file at the root of your project.
services:
  db:
    image: mongo:4.4.14
    ports:
      - "27018:27018"
    volumes:
      - /data/db
  web:
    build:
      context: .
    container_name: "apostrophe-container"
    ports:
      - "3000:3000"
    environment:
      - NODE_ENV
      - APOS_MONGODB_URI
      - APOS_CLUSTER_PROCESSES
    depends_on:
      - db
    volumes:
      - /srv/www/apostrophe/public/uploads
The spacing in this file is very important. Whitespace, not tab, indentation indicates that a particular line is nested within the object passed on the line above it. Walking through this file, it starts with services:. From the indentation, we can see that we are creating two services - a db: container and a web: container. Much like our Dockerfile, within the db: we start by specifying an image to run. In this case, it is the mongo:4.4.14 official image for running MongoDB v4.4.14. Other images can be found in the docker library GitHub repo README. You should use the version that mirrors your development environment.
Next, we are specifying that the database should communicate over port 27018. This is different from the port typically used in order to direct communication to the dockerized version and not a local MongoDB. If you need your database to communicate over a different port, you have to change it here and in your .env file.
Finally, we add a volume for the MongoDB storage engine to write files into. You shouldn't need to change this. Without the persistent volume at this stage, the database would appear to work, but all content would be lost on every restart.
Looking at the web: container, we aren't passing an image but instead passing build. Within this, we are adding context: . which specifies we should build the image for this container from the Dockerfile in the same directory.
To make accessing the container running our apostrophe easier, we are giving it a name using the container_name key. You can use any name you would like, but remember it for later.
The next two lines, starting with ports:, list the ports that the container should listen through, in this case, the typical port 3000.
The environment: key lists environment variables that will get passed into the container. We could set the value of these here but are using a .env file instead.
The depends_on: key indicates that our Apostrophe instance requires the presence of the db container that we created first.
Finally, much like with the database, we are persisting a volume for any uploads to be written into. Without this, any uploads would be lost the next time we deployed.
Creating the .env file
The last file we need to create before bringing our project up is a .env file at the root of our project containing the environmental variables. In this example file, we are assuming that you are hosting on a single server. Therefore we are setting the APOS_CLUSTER_PROCESSES environment variable to 2 to ensure that there is availability in case of a restart due to a crash. This number could be increased depending on your server.
NODE_ENV=production
APOS_MONGODB_URI=mongodb://db:27018/apostrophe
APOS_CLUSTER_PROCESSES=2
The only other line that might need alteration is the APOS_MONGODB_URI if your database needs to listen on a different port.
Spinning our project up
Bringing our project up in Docker is a two-step process. First, from the CLI run docker compose build. This will create our project image. You should see commands from your Dockerfile, messages from the npm install, and then the familiar messages from Apostrophe as it builds the assets.
When this finishes, you can run the command docker compose up. This will bring your project up and if you are using the defaults, allow you to access the site at http://localhost:3000. At this point, you won't be able to log in because it is a fresh database. To do this, you need to open a session with your container running Apostrophe. With both containers still running, give the following command from your terminal.
docker exec -it <container_name> /bin/shThe <container_name> should be substituted with the name you gave your container in the docker-compose.yaml file.
When the connection to your container is established, you issue the normal command for adding an Apostrophe admin to the database.
node app @apostrophecms/user:add admin adminNow you should be able to log in as admin.
If you want to bring the site down use:
docker compose downUpdating your project
Whenever your code or dependencies change, for example, when there is an update to Apostrophe, your container will have to be rebuilt. This can be done using the same steps as the initial build.
First, make sure your package-lock.json file is up to date by running npm update on your project repo. Then run:
docker compose buildAfter your container is re-built run:
docker compose restartSummary
While in this example, our project is still being hosted locally, any of these commands can be issued on a server that supports Docker once your project is deployed.
Right now, our Dockerized container is limited to a single server. For simple, low-traffic sites this could be fine. However, if we want to scale our site over several servers and add a load balancer like Nginix, we need to add support for cloud storage and a cloud database. Fortunately, Apostrophe makes this relatively easy.
Using AWS S3 services
If you aren't hosting your project on a single server, you will need to have a different uploaded asset storage method. Typically this is a service like Amazon Web Services S3 or another similar service. Apostrophe is set up to easily use S3 services by adding environment variables. You can read more in the documentation. We can take advantage of this in Docker by expanding our docker-compose.yml and .env files.
Changing the docker-compose.yaml file
In order to pass the environment variables into our project container we just need to add them inside the environment: key. If we are using S3 services at Amazon, we need to add four variables: APOS_S3_REGION, APOS_S3_BUCKET, APOS_S3_KEY, and APOS_S3_SECRET. For other S3-type storage solutions, such as filebase, you will also want to set the APOS_S3_ENDPOINT variable. For AWS, your environment: section should now look like this:
…
    environment:
      - NODE_ENV
      - APOS_MONGODB_URI
      - APOS_CLUSTER_PROCESSES
      - APOS_S3_REGION
      - APOS_S3_BUCKET
      - APOS_S3_KEY
      - APOS_S3_SECRET
…
Changing the .env file
Next, the .env file should be modified to contain values for each of the new environment variables. Each will get populated with values specific to your S3 buckets. Again, add the APOS_S3_ENDPOINT with value if using a service not hosted by AWS.
NODE_ENV=production
APOS_MONGODB_URI=mongodb://db:27018/apostrophe
APOS_S3_REGION=<your region>
APOS_S3_BUCKET=<your bucket name>
APOS_S3_KEY=<account key>
APOS_S3_SECRET=<account secret>
Finishing up
While our Docker container is now configured for storing items on AWS S3, it won't fully work if we were to spin it up now. First, we have to configure our S3 bucket to allow the public to access it. This is easily done through the AWS control panel.
First, select the bucket from the S3 management console and then click on the "Permissions" tab. Click on the "Edit" button to edit your permissions.
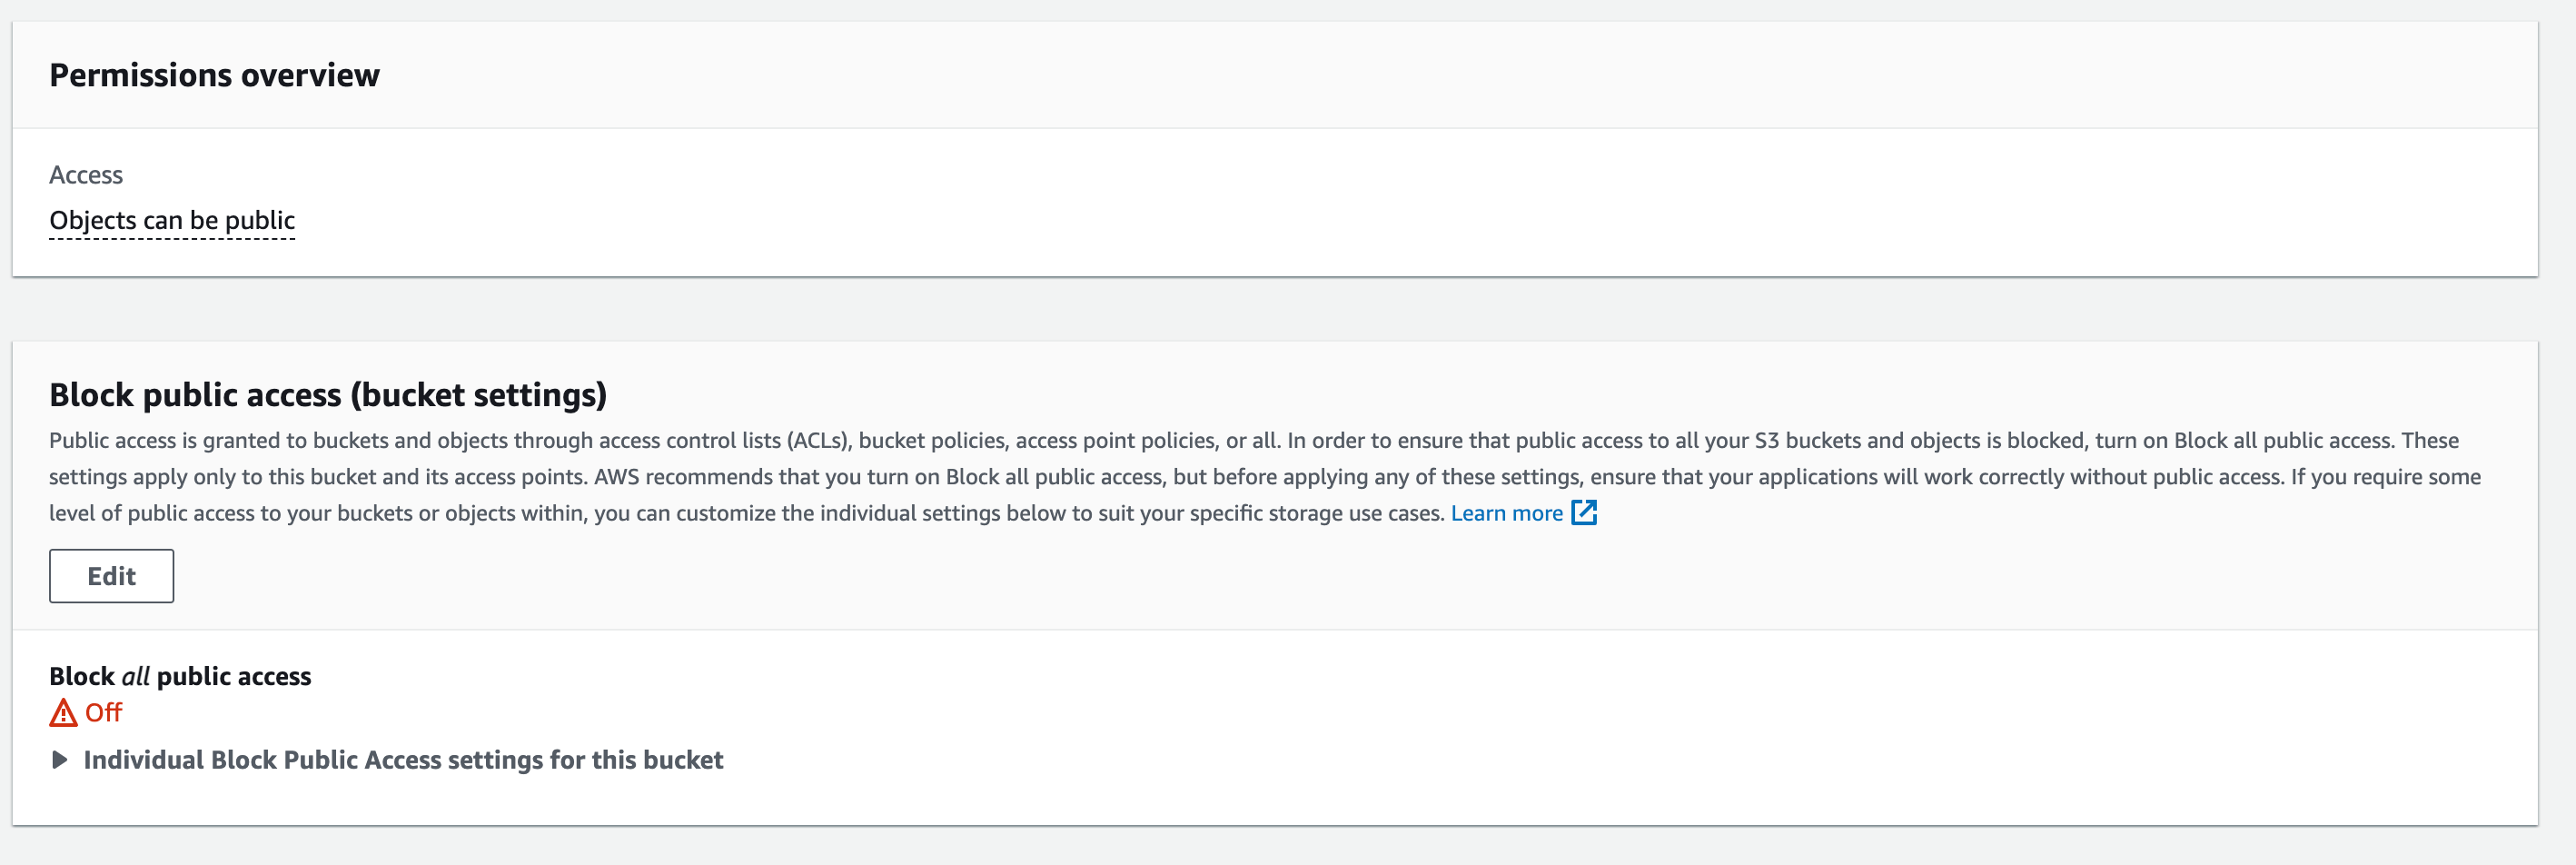
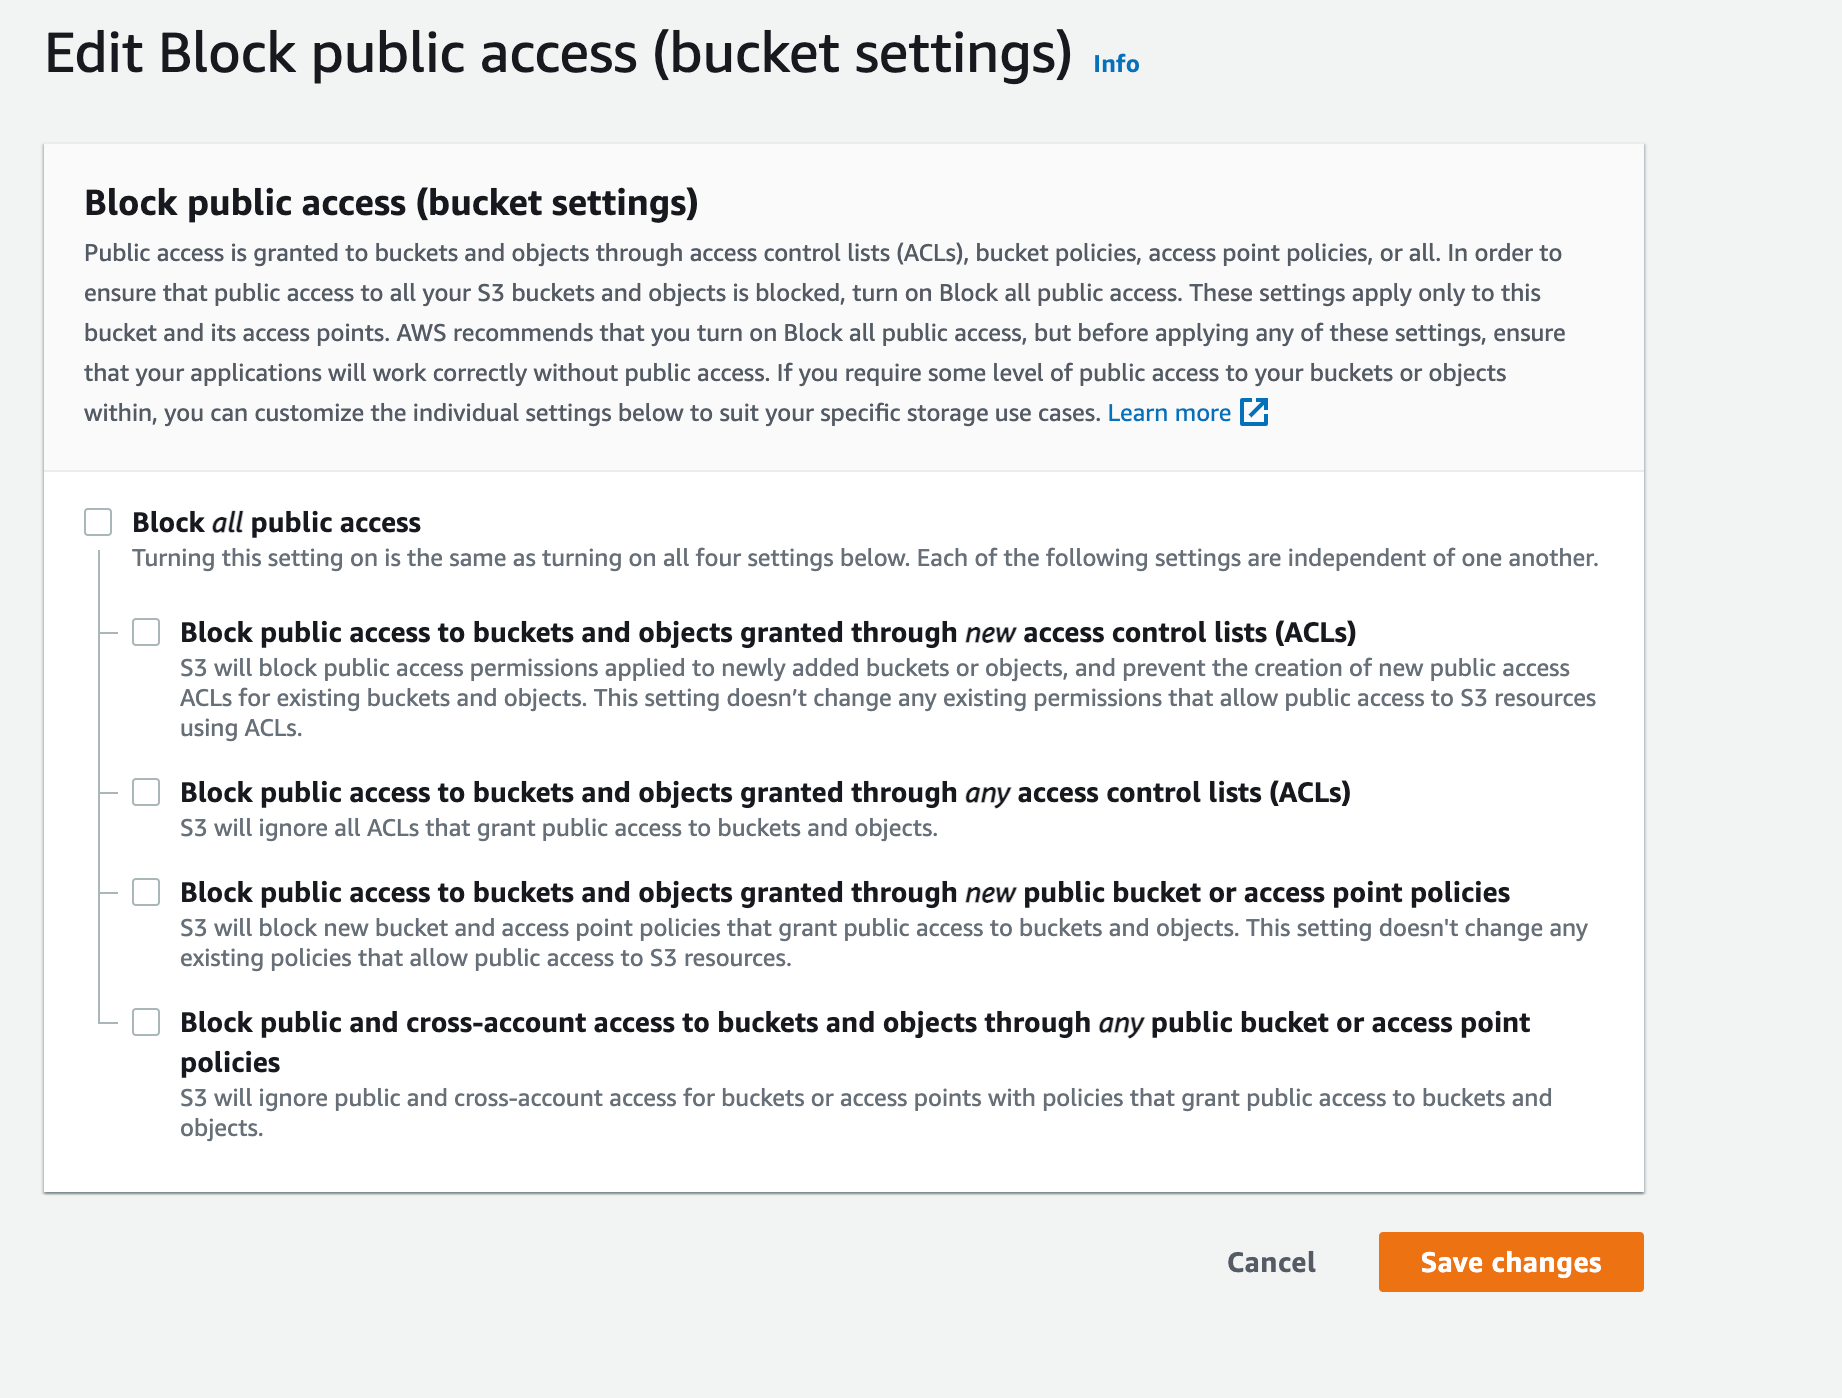
Uncheck the "Block all public access" box and save the changes. You will have to confirm that you want to do this.
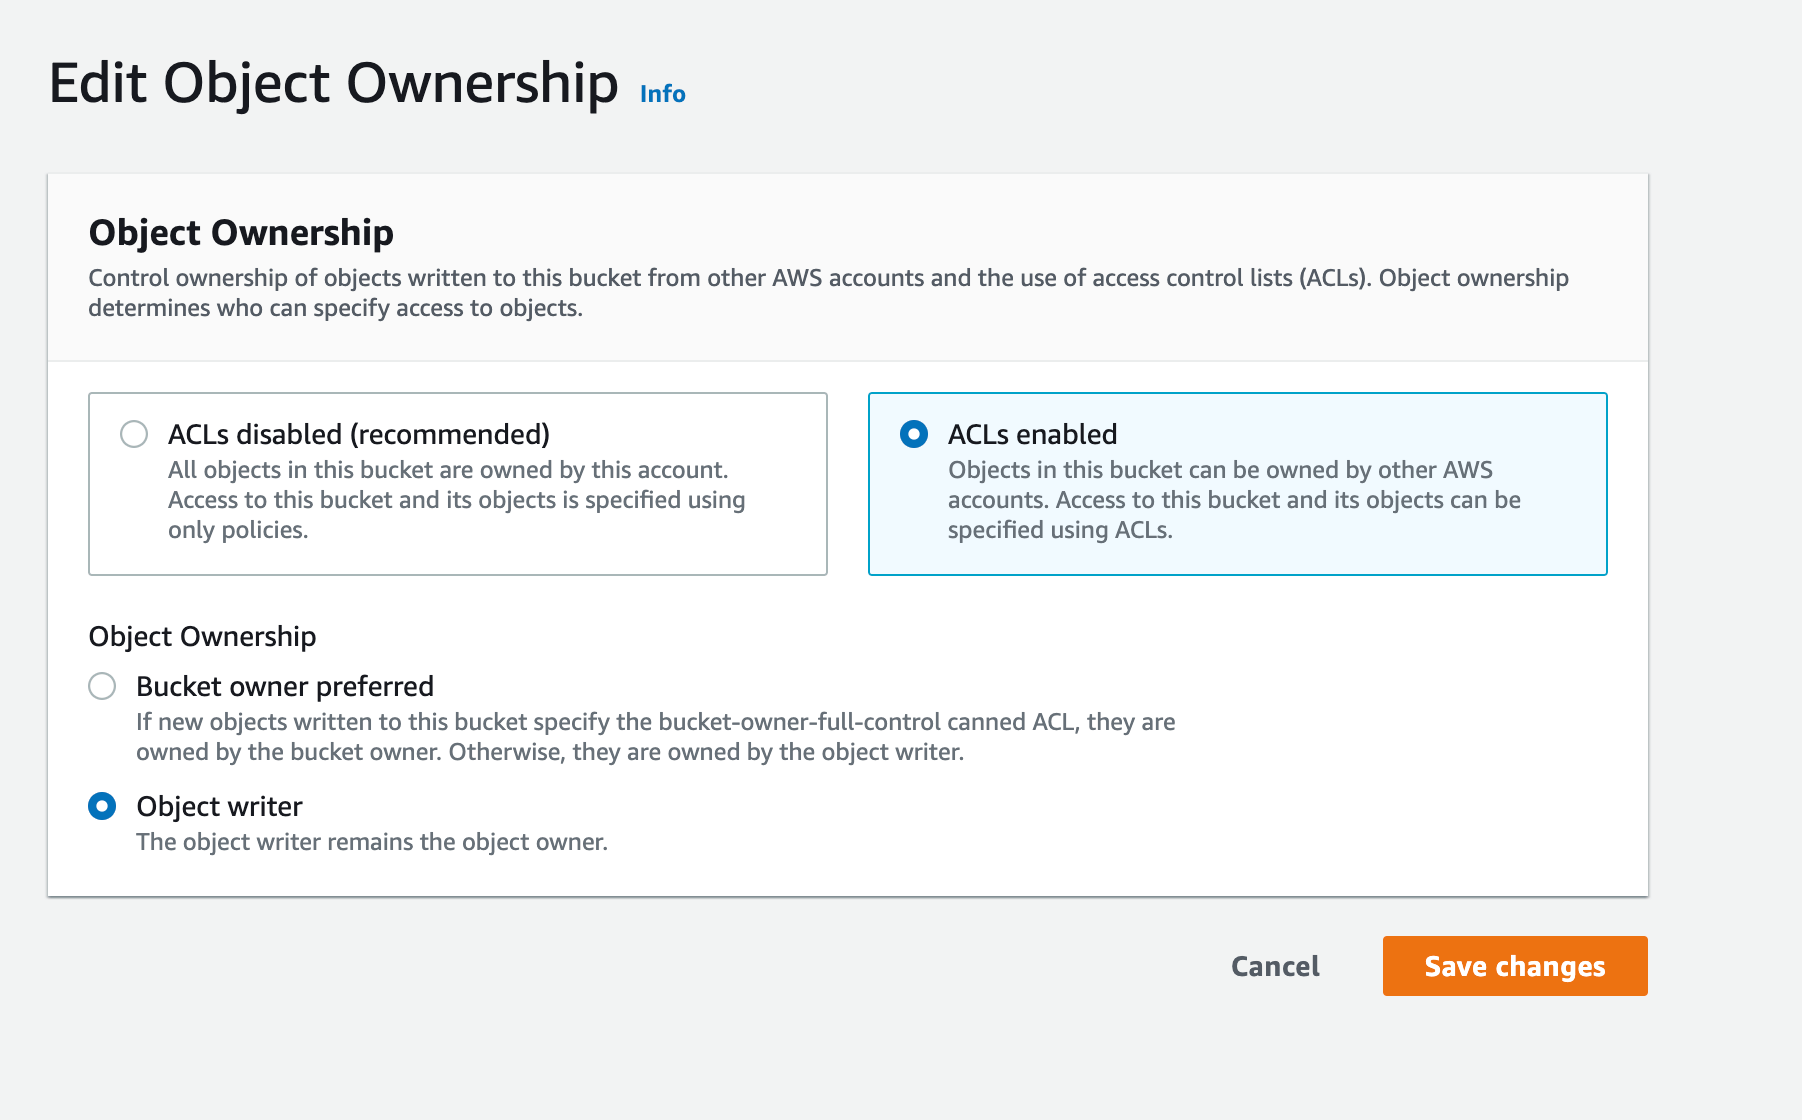
Scroll down the page to the "Object Ownership" section and click the "Edit" button.

Select "ACLs enabled" and "Object writer" then acknowledge the warning and save the changes.
Just like with the Docker container previously, you can now bring the site up with:
docker compose upAny assets uploaded through the site will now be stored in your S3 bucket rather than on the server directly.
Using MongoDB Atlas
MongoDB Atlas is a robust, multi-cloud database service. There are a number of advantages, but one is that using a cloud database means that our project can run on multiple servers but still all access the same database. If we run our project in a docker container without an accompanying database container, we don't have to use Docker Compose. However, since we have already built these assets, we can continue with these files. Two files must be altered - docker-compose.yaml and .env.
Changing the docker-compose.yaml file
Since we no longer have to use the database container, we can simply delete that whole section from the services:. Likewise, we can also remove the depends_on: section since we no longer have that container.
Changing the .env file
First, start by getting an account and setting up a project and cluster according to the instructions at the Atlas site. Once you do this, you can get the connect string for your database. The APOS_MONGODB_URI was already being set within the .env file. You simply need to substitute your connect string for the value.
INFO
Any special characters in your user name or password within the connection string need to be converted to %-encoding.
Finishing up
Since this will create a new database, once you bring your site up you should add an admin user as was detailed when we used the containerized version.
Then, to bring the site up use :
docker compose upDeploying
Great, so we have a working Apostrophe Docker image. How do we get it on the web? There are many options. Here are a few.
- Automated builds from GitHub
- Install Dokku on the server then use Dockerfile deployment
- Use
docker saveanddocker loadto deploy without a private registry - Build the image directly on the server
- Many more (use a web search!)